Skip to content

July 2021

Plotjuggler Dataflash plotting!

https://youtu.be/ocyd0ikqQfo

Hello guys,

You may be used to MAVExplorer.py or MissionPlanner for Dataflash analysis. I offer you another alternative : Plotjuggler

This is a tool that people using ROS may know already, but it is extensible with plugins support. So I made an ArduPilot Dataflash plugin : https://github.com/khancyr/plotjuggler-apbin-plugins

What are the advantages of Plotjuggler : - it is fast - it supports livegraphing - it got 2D graph support - it got a LUA script math engine - it got totally unprofessional Splash screen

There is one important issue with the plugin currently. Plotjuggler is expecting lower case file extension for logs, when ArduPilot is using capital BIN type file. So you need to rename your logs to lower case bin.

Have fun with it !

Speeding up compilation time

compiling|413x360 https://xkcd.com/303/

Hello friends,

Some time ago, I left my job for new adventures. Doing so, I lost my company recent laptop and then my development workflow get really downgraded. I am now using an old 2011 laptop with i5-2410M (2 cores at 2.3Ghz) and 4Go RAM DDR3. That is still decent but when you taste the speed you cannot get back ...

Well, my issue is the compile time for reviewing PR on ArduPilot.

Standard setup

With the default installation a full build with waf takes 7m14s.

Yep, you should use just waf or waf copter for example instead of waf -j4. The -j stand for --jobs and is the number of compilation jobs you want to use. The more you use the more CPU cores and computation power for compilation you will use. Generally, you scale the number of jobs with the number of threads your computer support. On my laptop, I got a 2 cores CPU with 4 threads. That means that I could do 4 compilation jobs in parallel ! On contrary of make that need the number of jobs explicitly passed, waf is already taking care of maximizing the number of jobs on your machine.

Fortunately, like make and other builds system, waf is smart enough to not do full rebuild each time we made some change. But this generally won't work when we switch the branch on git or, obviously, do a waf clean.

Best standard setup

If you followed our installation instructions correctly, you should have seen that when you are using waf configure the output looks like :

Checking for 'g++' (C++ compiler) : /usr/lib/ccache/g++
Checking for 'gcc' (C compiler) : /usr/lib/ccache/gcc

instead of

Checking for 'g++' (C++ compiler) : /usr/bin/g++
Checking for 'gcc' (C compiler) : /usr/bin/gcc

What does it mean ? On the second case, waf is detecting GCC and G++ as the C and C++ compiler, that is the intended setup. On the first and rightful case, waf is detecting ccache as the compiler. Ccache is a compiler cache. It will put in cache previous compilation file to reuse them !

You can use ccache -s to get a summary of you cache usage. In my case :

cache directory /home/khancyr/.ccache
primary config /home/khancyr/.ccache/ccache.conf
secondary config  (readonly) /etc/ccache.conf
stats updated Wed Feb 19 13:31:20 2020
stats zeroed Mon Nov 11 19:20:57 2019
cache hit (direct) 3513
cache hit (preprocessed) 117
cache miss 12804
cache hit rate 22.09 %
called for link 483
called for preprocessing 78
compile failed 33
cleanups performed 208
files in cache 117
cache size 1.4 MB
max cache size 5.0 GB

It reuses 20% of the cache instead of compiling, and that is pretty interesting to speed up your builds !

After a small change on ArduPilot file, using waf but this time with ccache, I get a build time of 17.9s. Well, mostly everything is in cache, so I don't have to recompile everything !

Sadly, that won't work in all case, and plenty of time in need the full and long build. Then, how to speed up compilation ?

Using another computer to speed up compilation

I got a gaming desktop computer with a 4 core i5 and 16Go DDR3 RAM. That is a also an old computer but that is a beast comparing to the laptop ! As I got Windows, games and most of my important file (picture, papers, etc.) on it, I don't want to risk myself to dual boot it to have a Linux on it. The simpler way was to instead a virtual machine on it. I used VirtualBox and setup a Ubuntu VM.

On Linux, it exists a utility called distcc that allow to distribute the compilation tasks across multiple computer ! That what I am going to use.

Setup

On Ubuntu the installation is simple : sudo apt install distcc gcc g++ ccache Obviously, you need a compiler to make it works, and I also install ccache as it will serve. You can use systemctl enable distccd to auto start it on your machine.

Now you get distcc on your VM waiting for compilation order. You need then to show waf how to use it. I have create a new file called distcc_config with content :

export CCACHE_PREFIX="distcc"
export CC="ccache gcc"
export CXX="ccache g++"
export DISTCC_HOSTS='localhost/4 10.42.0.79/5,lzo'
export DISTCC_JOBS=$(distcc -j)
echo "Building with $DISTCC_JOBS parallel jobs on following servers:"
for server in `distcc --show-hosts`; do
server=$(echo $server | sed 's/:.*//')
echo -e "\t$server"
done

Here is what it does :

  • CCACHE_PREFIX allow us to use distcc on our computer in combination with ccache. I would be a same to not have it.
  • export CC and export CXX explicitly set the compilers for distcc.
  • DISTCC_HOSTS need, unfortunately to be set manually. It said to distcc what computer use and the number of jobs they can handle. In my case, localhost/4 is for my laptop : 4 jobs. 10.42.0.79/8,lzo for my desktop computer : 8 jobs and lzo to compress file to send.

Now you can invoke waf -j $(distcc -j) to ask waf to compile with distcc max number of jobs, in my case 12 jobs. distcc2|634x500

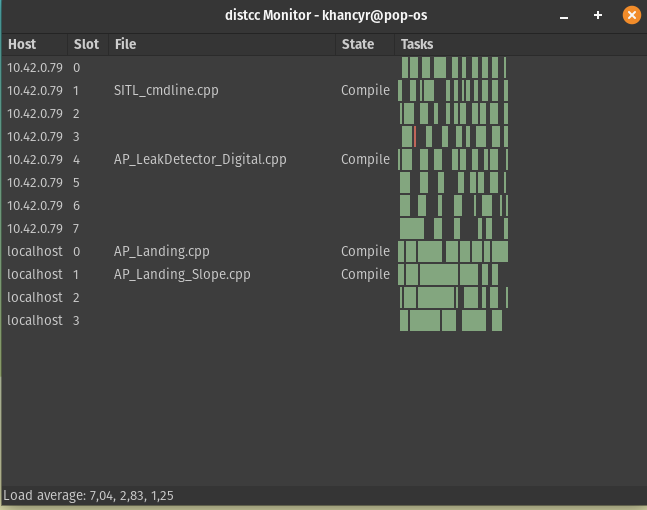
The result is a full compilation in 4m10s with the drawback to use a lot my network, but as I am on a gigabyte Ethernet network with nobody watching 4k video, that isn't an issue for me !

My solution was to use VirtualBox, but if you are more used to Docker, you could just use a lightly machine with distcc only for the same purpose.

Edit: Funny things, I give another try on WSL and success make it work. It was even better that with VirtualBox as it achieved compilation in 3m36.658s

Limits

Limits to distcc usage : - you need the same version of the compiler on each computer. - it will use a lot your network to transfers file to compile and compilation results. - using your dusted RPIs won't bring much help against using a decent CPU.

Conclusion

I hope you learn something on how to speed up compilation on ArduPilot, unless you really need it, I won't recommend you to use distcc as the setup and maintenance can be tricky. The default ArduPilot environment with Waf and Ccache should be enough in most case to get the maximum performance out of your machine.

You can still help us on the project to make consecutive compilation faster by helping us to clean the inclusion dependency on ArduPilot. With clean inclusion, waf will be able, on its own, to recompile only the part that need to instead of compiling back everything.

Code Coverage at ArduPilot

Credit to CommitStrip : https://www.commitstrip.com/en/2017/02/08/where-are-the-tests/?setLocale=1

You may have seen in the latest weeks that the devs were speaking about Coverage. What is that ?

Coverage or code coverage is a technique to gather statistics on which line and function on the code we actually test !
You may be aware that at ArduPilot we have an automated test suite that runs numerous tests each time someone proposes a contribution. But an important question remains : Does the test suite cover the code change ? That is the whole point of code coverage analysis that gives us lines by lines, and functions per function, which ones are called and which ones aren't. The more your tests cover line of code, the less chance you have to have bugs. That is why certification in Aeronautics or in the car industry is long and costly since reaching 100% coverage is close to mandatory and hard to achieve ... resulting in the unfortunate scandals, these two industries have faced in the past few years.

That is why in the latest weeks, Peter Barker and myself push some effort on getting better support on code coverage. We are now getting a simpler script to run the coverage gathering and we will get automated statistics updated every week.

The most important question that you are now asking is : how much code coverage do we have ? On 2021-05-20, we were on the whole project at:

Lines 52.2 %
Functions 61.9 %

We can also details the statistics per vehicles :

Copter
Lines 64.1 %
Functions 80.8 %
Plane
Lines 61.5 %
Functions 80.5 %
Rover
Lines 57.7 %
Functions 78.7 %
Sub
Lines 33.9 %
Functions 53.4 %

That isn't that bad but not the best either. We can also see that our testing is unequal among the vehicles, the Sub being the less tested vehicle. You can have access to our latest report on our server at https://firmware.ardupilot.org/coverage/

How do we generate this

To gather the code coverage statistics, we are running all our tests ! That means : - Unit tests : Those are simple tests on functions to test that one input gives the expected output. We don't have much Unit tests, but most of them are in AP_Math library, to test our maths functions https://github.com/ArduPilot/ardupilot/tree/master/libraries/AP_Math/tests - Functional tests : Those are autotest. We are running simulations test cases with a fully simulated vehicle and test whatever we want : Mavlink message input, sensor failure, autotune, RC input, etc. We got around 300 autotests running currently and the number is growing.

There is now a script run_coverage.py in Tools/scrips/ that allow you to do the coverage testing. You can use it like that : - First you need to set up your build configuration and build the right binaries. We need to build the SITL binaries before running the coverage tools ! And those need to be built in coverage mode, obviously, and debug mode, to minimize the compile optimisation. The invocation is Tools/scripts/run_coverage.py -i, where -i stands for init. It will then check that you got the right binaries with the right compilation flags. If that isn't the case, it will build them. And finally, it will initialize the code coverage handling with the binaries you built.

You can now launch as much testing as you want, running SITL or making some corrections on the code. Each time you will launch the tests, the coverage handling will run. For example, you can run the Rangefinder drivers testing with : Tools/autotest/autotest.py test.Copter.RangeFinderDrivers

To display the coverage, you need to ask for the statistics - Tools/scripts/run_coverage.py -u will do it for you. At the end of the script will ask you to open the index.html that will be in the reports directory. This will open the same kind of web page with the coverage statistics than on our server.

To run every tests, - Tools/scripts/run_coverage.py -f, where -f is for full, will do the building and run all tests. This is really long : around 2h30min to launch every test. That one current limitation of our autotest suite : we don't do parallel testing yet.

Why does code coverage matter

Doing code coverage analysis when writing tests is a good exercise to understand the code and check that we are truly testing what we want. It is something to write tests, but it is better if the tests are right ! During the writing of the code coverage script, we find numerous bugs into the code base. Here are some examples : - Autotest.py wasn't passing all arguments correctly : https://github.com/ArduPilot/ardupilot/pull/17554 - On AP_Rangefinder, we use a virtual function in the base class constructor. This is an issue as the compiler doesn't know yet about the derived class. It led to some driver functions not being called on initialization. Hopefully, those aren't critical. https://github.com/ArduPilot/ardupilot/pull/17660 - More testing for AP_Math to have the library closer to 100% code coverage with only unit tests : https://github.com/ArduPilot/ardupilot/pull/17609 .

What is next

As you have seen we don't have the best code coverage, we are looking to improve this. You can totally help to make the project better by creating new unit tests or functional tests ! This is a good way to learn about the code and contribute to the project.

RTKBase with Partner ArduSimple Kit

Ardusimple_logo|690x418, 50%

Hello friends,

What is better than a GNSS(Global Navigation Satellite System)/GPS (Global Positioning System) ? 2 GNSS ? No, it is an RTK (Real Time Kinematic) GNSS of course !

Indeed, if we simplify, classic GNSS units can achieve between 2 and 10m accuracy, when an RTK unit allows it to reach centimeter accuracy.

But obviously, that is expensive ... You may have noticed that ArduPilot welcomes a new partner that is ArduSimple (https://www.ardusimple.com). They are providing a lot of cost effective RTK ready GNSS boards. And they lend me a RTK Kit. I could have redone their GPS heading tutorial with 2 GNSS (https://www.ardusimple.com/ardupilot-simplertk2bheading-configuration/) but I decided to go another way that is how to make a shareable RTK Base !

I will be speaking about GNSS as that is the generic term for those sensors. The GPS is the USA satellites constellation, whereas GNSS are now able to use multiple constellations like GLONASS, GALILEO, etc.

Multi SITL on homecloud

|624x312

Hello friends,

You may remember that some time ago, I made a post about multi robot simulation with ArduPilot (see https://discuss.ardupilot.org/t/multi-systems-patrol-simulations/35740/1).

This was during my PhD, I didn't have much time nor funds to push my simulation into a cloud system for larger scale simulation.

Well, that is still not the case! But I got a bunch of small boards that do nothing in my apartment, so I made a small homecloud to make more simulations.

In this video https://www.youtube.com/watch?v=SMISOREe1y4&list=PL6sCNLbHuYxZVRAbnLY5Xxkr5f4rQeJCJ , which is quite long, I tried to explain how to do it.

The demo

This is a demonstration of the simplest group behaviour : follow the leader (or wolf-pack). This demo relies on ArduPilot simulator : SITL (Software In The Loop). The simulation uses the same code as the real vehicle with some simulated sensor. This is quite convenient to work on the code and do testing as the transition to the real vehicle will be easier. ArduPilot supports a large set of behaviour, and lucky me, the follow behaviour already got a library, so it is just a matter of enabling it to use it.

The behaviour is quite simple. We define a leader that will stream its position to the followers. Each follower uses the leader position to calculate its new position.

On ArduPilot, we can choose who the leader is and the position of the follower relatively to the leader. So, in this demo I made a more complex follow the leader behaviour.

My master leader is drone 1. Drone 2 to 4 are following drone 1. Drone 10 is following drone 2. Drone 11 to 13 are following drone 10. Drone 20 is following drone 3, drone 21 to 23 are following drone 20, etc.

|624x451

The result is what we can see on the video, it is not perfect but it is working.

As I am using a simulation, I use a multicast protocol to allow each drone to get the information from the other. That is the equivalent to broadcast mode on a RF-radio.

In order to launch the simulation, I have made a small python script using Pymavlink. Pymavlink is a set of tools to control drones using the MAVLink protocol. That is the main protocol used by open source drone autopilot like ArduPilot. The python script is in charge of putting the drone in Guided mode that is an automatic mode that keeps the drone in position waiting for an order. Then it issues a takeoff when the drone is ready and then setting the Follow mode. Finally, there is a control loop at the end as the follow mode will disengage if the drone to follow goes too far or in case of issue. The control loop is in charge to set it back.

The drone 1 is using the Python script to stay in Guided mode and got some random target position over the CMAC field that is SITL default position (that is in Australia since ArduPilot mains developers are in Australia).

|624x684

Don’t fear my python script, it is quite long but most is useless for this demo. If you look closely you could see that most functions are just copy-paste from the ArduPilot autotest framework (https://ardupilot.org/dev/docs/the-ardupilot-autotest-framework.html).

This script will be added to the Pymavlink repository as an example on how to use Pymavlink for drone programming.

I could have used LUA scripting to achieve the same behavior as ArduPilot support. LUA scripting is a scripting language that can be used directly on drones. I am more at ease with Python and want to demonstrate how to use Pymavlink for simple tasks, so no LUA

Homecloud

|624x468

My homecloud is composed :

  • 1 raspberry pi 3 : that is 4 cores so 4 vehicles

  • 1 odroid C1+ : that is 4 cores so 4 vehicles

  • 1 balena fin (RPI3) : that is 4 cores so 4 vehicles

  • 1 odroid XU4 : that is 4 cores so 4 vehicles + the GUI

That is pretty conservative, most should be able to use 2 vehicles by core. But I prefer to play it safe with my power consumption and heat management ... those are in my living room, so it isn't nice to have some fans at full speed all day long !

System setup

I am not a cloud engineer, so I don't really know the best technology to use. I could have set up each board with their own OS, installed docker or Kubernetes and some VPN but that is really a pain to manage on the long term ... So, my choice was set to BalenaCloud. Their system is quite simple to set up, support docker and project versioning with Git. Bonus that the same system on all boards, so I code only once for all boards and use git push to update them ! They are also offering a cloud GUI, VPN and a public web address to serve a simple web application. That's what I needed. As I put my homecloud on the public web, even through Balena VPN, I have put it behind an isolation router that puts my homecloud on a separate network than the rest of my home equipments.|624x308

Simulation cloud architecture

The system will be quite simple :

  • Each system will be loaded with BalenaOS and the same docker-compose script to spawn the vehicles.

I made a launch script to be able to use their website to control the simulation. Basically, it exposes some SITL parameters and an ON/OFF parameters, to be able to stop the vehicle in need.

  • I made a clean docker image for SITL, as I need to use Python the image is still around 200Mo. That doesn't seem much, but considering that for just SITL the whole docker image is 6,3Mo... it is big. Lightweight docker image is important for simpler and faster deployment (and saves a lot of power on storage and transfer).

  • The GUI : that is a MAVProxy plugin using CesiumJS. MAVProxy is a Python Ground Control Station (GCS) for MAVLink drones. MAVProxy is connected to the multicast port, gets each drone infos and streams them back to the Webbrowser. The web application updates each drone position and displays it.

  • How to handle multiple vehicle connexions to the GCS without doing it one by one ? SITL supports a multicast protocol and most GCS are able to use it ! That means that we only need to set up all vehicles to connect on the same multicast port and the GCS will have all vehicles available ! Unfortunately, the multicast protocol isn't handled well by docker so we need to expose the full network stack to make it work. That isn't an issue for my project as all my boards are on the same network but it could be an issue on a real cloud. A simple solution for this issue could be to use a VPN like Zerotier to make a bridge between the different instances.

  • How to play with the vehicle from the web ? That is where BalenaCloud is nice, and they give a secure link to your instance. The downside is that only http port 80 is enabled. So I bypass this restriction with a proxy to be able to use multiple ports and redirect the connection on port 80 to the right port on the board.

The Docker files for those that want to replicate : https://github.com/khancyr/balena-docker_swarm_follow

CI at ArduPilot

|624x385

At ArduPilot, we are working hard to improve our contribution flow and testing. You could have seen those last years that our Continuous Integration system was greatly improved. We are now testing building against 19 boards for 4 vehicle types (multicopters, submarines, ground and sea vehicles, plane types) in addition to the simulation testing with around 300 functionals tests and unittest !

Those allowed us to bring more change into ArduPilot with greater confidence and allowed us to track down bugs before they reach the codebase.

Nevertheless, working on a large audience open source project can be hard as the code is changing fast and the Pull Requests (code contributions) are often quickly outdated. This brings up two questions : can we still rebase our work on top of the main branch ? How much flash memory the new change will consume ?

ArduPilot is well optimised for microcontroller boards like STM32 brand, but we need to be careful on our flash requirement as we support boards with a 1MB limit.

That is why we just made a slight addition to our CI system. We now have a new rule that will try to do the rebase against the main branch for a representative set of boards : one 1MB limited, one STM32F4 based one's, one STM32H7 based one's. And we also do a binary size comparison. This allows us to directly get access to the change in flash consumption on the CI system.

|624x311

There is still more work to improve our CI and workflow system, if you want to help us, you are welcome to !