
Hello friends,
A recurrent question I got is : How to use ArduPilot SITL (Software In The Loop) with Docker. For those that don’t know what Docker is, it is a container management service : a kind of Virtual Machines (VM) but for applications. This can be really useful to set up a build environment for ArduPilot or simulation with a level of reproducibility as we can manage close to everything like in all VM systems.
Docker can be used in numerous ways with ArduPilot and I will try to share some knowledge on this series of blog posts.
Docker builders
The first usage of docker is generally for build environments. It can be tricky and time consuming to set up a build environment for ArduPilot, and using Docker can help.
So you may have seen this file on a bunch of ArduPilot repo.

That DockerFile allows you to set up a build environment. The one on ArduPilot is a generic builder. It is able to build all boards and run SITL in cmdline mode, so no GUI on Mavproxy. It can be used in different ways. But the first step will always be to build the Docker container.
From the repository root directory (the one that contains the Dockerfile file), run :
docker build . -t ardupilot
Depending you Docker version, you should have an output like this one :
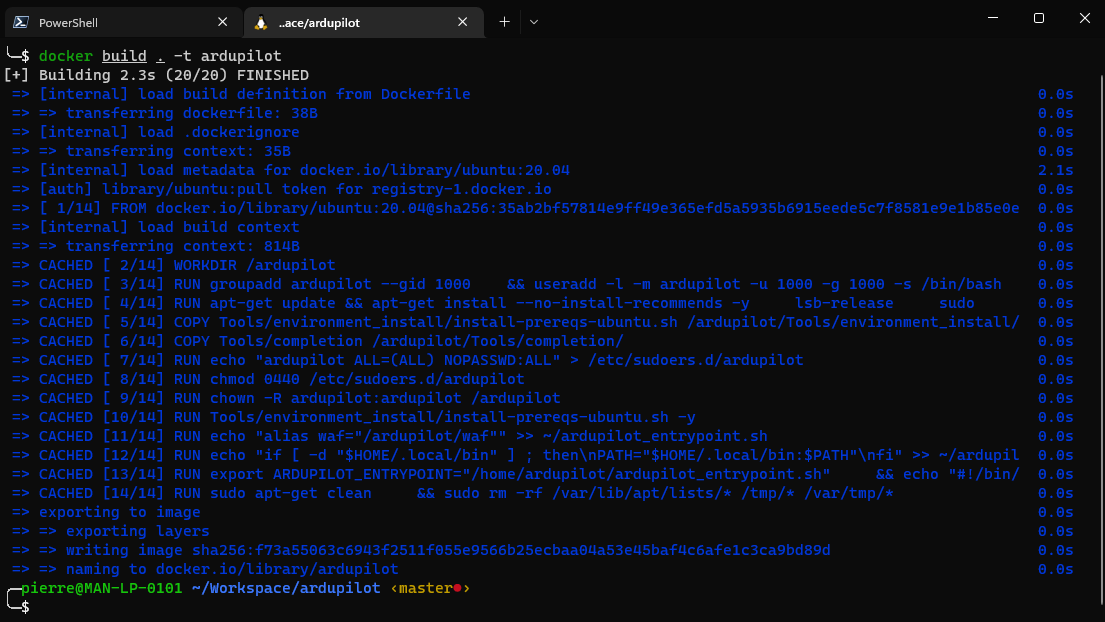
The dot . says to build the container from the current directory and -t is used to give the name ardupilot to the container we are building.
Analysis
What does it do during this build ? The same things that you do when you configure your computer!
Getting Ubuntu, creating a user, installing some software. It uses ArduPilot install script Tools/environment_install/install-prereqs-ubuntu.sh.
And you can see some environment variables :
ENV SKIP_AP_EXT_ENV=1 SKIP_AP_GRAPHIC_ENV=1 SKIP_AP_COV_ENV=1 SKIP_AP_GIT_CHECK=1
Those are passed to the install-prereqs-ubuntu.sh script to control what to install. So by default we disable all GUI support packages, code coverage support and running git update at the end of the build.
Why those choices ? If Docker can be really useful, it is still close to a virtual machine and the setup of the GUI environment isn’t straightforward. So we chose to not install all those packages to keep the Docker Container simpler. I won’t cover here how to use the GUI.
Build environment.
The most common usage of the DockerFile is to set up a build environment. After building the container, you can enter in it to run your ArduPilot development like you would do in a normal Linux computer.
To do so :
docker run -it -v `pwd`:/ardupilot ardupilot:latest bash
This mounts your local ArduPilot repository into the Docker container and puts you inside. You can then run waf commands and build ArduPilot binaries !
It has drawbacks on Linux systems. As you are sharing the filesystem, you can have some permission issues with the built binaries as the default user inside the container is not necessarily the same as your computer default user. To solve this, you can pass
-u "$(id -u):$(id -g)" to set up the Docker user as your computer user. That way, what you build on Docker will have the same owner as your current user, and you can use the resulting binaries directly.
You can notice that we don't pass the --rm parameter that you can find in some other Docker documentation/example. This is to not destroy the container when you exit it. During the installation phase, we are installing some caching tools that will help to speed up the nexts build in the container. If you destroy the container each time, you won't benefit from the cache. This can be useful if you want a true clean from scratch build each time.
Builder.
The docker builder can also be used as a cmdline tool to build firmware. So let’s say you want to build CubeOrange firmware for Copter, you can simply used the container that way :
docker run --user $(id -u):$(id -g) -v `pwd`:/ardupilot ardupilot:latest ./waf configure --board CubeOrange
To configure the build for CubeOrange. And then :
docker run --user $(id -u):$(id -g) -v `pwd`:/ardupilot ardupilot:latest ./waf copter
To build !
What is the difference with the previous one : we don’t run an interactive session into the container, we can use it as a builder tool !
Docker CI (Continuous Integration)
You may have noticed that we are running a lot of automated tests on our Github repo.
Those tests are also running into Docker containers. We could have used our install script to set up the test environment for each test but this is a waste of resources and time, so we optimize the container for our CI.
If you search about ArduPilot Docker on your favorite search engine, you will probably find :
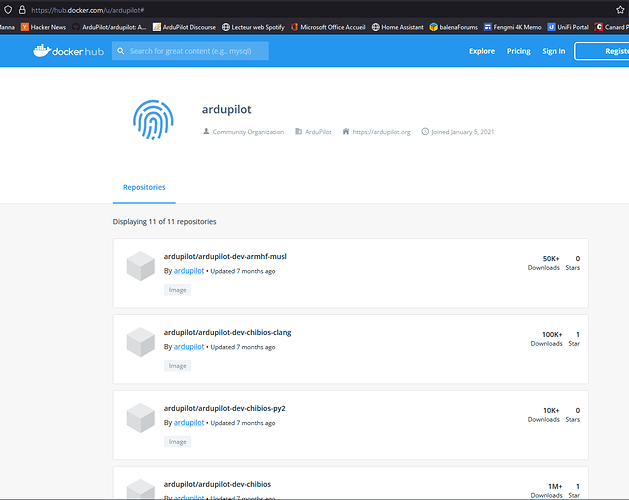
https://hub.docker.com/u/ardupilot! Those are the docker containers that we are using to run CI. They are made from the definition on this repository : https://github.com/ArduPilot/ardupilot_dev_docker
They are simply setting up the environment and tools we need to run ArduPilot tests. Therefore there is one container per test target to optimize test run time. The CI workflow is the following :

We don’t recommend using those containers outside the CI environment as they are intended for CI and lack general purpose tools in them.
Conclusion
You got, now, a brief summary on how to use docker to build ArduPilot binaries. If you look on the wiki repository, you will see that you can also use it to build the whole wiki. A strong advantage is that you can use this on all OS like Windows to have a clean and isolated build environment !
Next post will introduce how to use SITL with Docker with some swarming examples !